Welcome to the Portlet page! Scroll down for downloads
The name Portlet is a portmanteau: Programmable + Outlet = Portlet
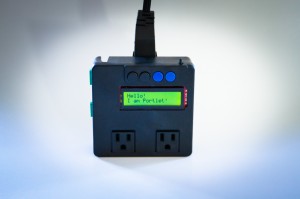
Originally built on the Arduino platform, the Portlet is a convenient way to control outlets. It is currently built to plug into a common Nema 15, 110 VAC wall outlet and provide two relay-controlled outlets.
Additionally it has two thermocouple inputs. There are so many applications involving outlets and heat that it just made sense to include these.
The UI consists of 4 buttons (plus one Reset button) and a simple 2×15 character LCD screen.
The number of applications for this little device is pretty impressive! Hopefully this inspires and enables you to create many fun projects.
And if you DO create fun projects, be sure to document them and share them in the comments!
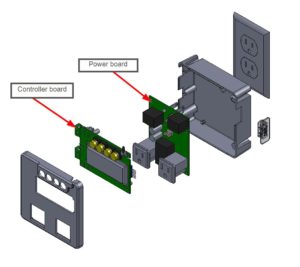
Please remember; the Portlet consists of 2 boards: the Power board and the Controller board. The Power board converts 120 VAC to +5 and controls the 120 VAC outlets. The Controller board is powered by +5 and holds all of the user facing components for safety. Several different Controller boards have been designed and tested using your favorite programming interface.
Here are a bunch of resources for the Portlet:
Portlet Power Board 1.0:
The first rev of the Portlet Power Board uses mechanical relays to control the 2 outlets and supplies +5VDC. The 4 pin connector going to the Controller board is:
- GND
- +5VDC
- Digital control of Outlet 1
- Digital control of Outlet 2
The 2 digital controls are expecting a +5 V signal from the controller board to engage the relay allowing power to flow to the controlled outlet.
Downloads:
Arduino Portlet 1.0 (Controller board and Power board):
Rev 1 is a fully tested design working with an Arduino Pro (5V version) as the brain. All the components that are spec’d are through hole parts for easy soldering as this was intended to be a DIY kit.
Downloads:
- Arduino Portlet v1.0 Controller Board Eagle files
- Arduino Portlet v1.0 Controller Board Gerber files
- Parts List Portlet 1.0
- Assembly instructions
CAD .STL files for download (if you want to 3D print your own case. However, if you purchase from here you are gratefully helping to fund the project … ):
Links to sample code on Github:
- Code for all the below projects hosted on Github
- Document describing what the “Testing Code” is doing for confirming a good build
PDF Tutorials / Project ideas
- Yoghurt Tutorial
- Beer brewing
- Brewing Temperatures Tea and Coffee
- Soldering Iron Safety
- Using Portlet for a Reflow Oven
- A random list of possible project ideas
Photon Portlet 1.0 (Controller Board only):
This version was all about going wireless! Instead of an Arduino, the Spark Photon is now the brain!
To achieve this build, we purchased the Spark Photon Kit then we just had to rearrange the traces on the board. All the other components used are the same (so it’s still all through hole components)
FYI: This still uses the Portlet Power Board 1.0. So if you had built an Arduino Portlet 1.0, you can just build a new Controller board and swap it in there; they are interchangeable!
The Spark website has a ton of info about programming their board. Using their published demo app, here is a YouTube video showing control of the Portlet
Link to video showing Photon controlling the Portlet
Linkit Portlet 1.0 (Controller Board only):
Linkit has produced a super powerful board! We made a new Controller Board design for the Portlet based on the powerful LInkit Smart 7688 Duo board. We made it a direct swap for the Arduino Pro board so all of the sketches posted in the Arduino Portlet 1.0 section will work with no modification!
This works with the Portlet Power Board 1.0 and the same parts list (except you swap out the Linkit module for the Arduino Pro)
Note: The Linkit digital outputs produce 3.3 V. The Sparkfun LCD requires 5V so the the backlight doesn’t work with the Sparkfun LCD (unless you modify it). However, the Jameco LCD seems to work fine with the 3.3 V output
Another note: the footprint for JP1 in the below files is a 6 pin but only pins 1-4 are being used so make sure you put the 4 pin connector in the correct pins.
- Linkit Portlet logic v1.0 Controller Board Gerber files
- Linkit Portlet logic v1.0 Controller Board Eagle files
- Linkit Portlet 1.0 Assembly instructions
If there is enough demand, the next rev of controller board will most likely be an SMT version of Portlet so we can offer it preassembled. But … it hasn’t been done yet …
Some other thoughts for future revisions:
- Solid State relays
- Dimming circuit for outlets
- Current monitor on outlets


Are you planning on launching another kickstarter?
If not, how do I get one and for how much?
Hello! If I get enough interest I will gladly attempt another Kickstarter.
But for now, you can buy all the parts and assemble it as a DIY project. The cost of all the components comes out to about $130. All the components and instructions for assembly are posted here (and if they aren’t let me know and I will post them!) Or get a bunch of people to start saying they want to buy them fully assembled and maybe I’ll spend a weekend assembling a few and put them up for sale. I’d love to see this project grow.
Hello is it possible to use the portlet for 220Volt?
Thanks
Hello! The Portlet was built around a Nema 15 outlet plug. I think this style of plugs are always 110 V. The spec sheets for the internal components say they can all handle 220 V so if you have a adapter for the outlet plug it should work, but I personally have not attempted it. I strongly urge you to review the spec sheets before trying it! And if you do, please post here for others reference.
If we can get enough interest, I’d love to make a 220 V version for our European friends. Maybe another Kickstarter attempt??
I’d definitely be up for a 220 unit, possibly 2 of them
Noted!
What style of outlet plug do you use?
There is no way this needs to cost $124 to build. For example, you can get the Arduino Minis for less than $2 on Ebay all day long. You could also build the AC to DC yourself and save a lot of money.
It would be useful to also post the Eagle parts library named “misc” for the parts used in the design.
Do you know of a quick way in Eagle to collect all of the parts used in a design and export them as a single library?
How hard would it be to add humidity control in addition to temp? I think this could be used as areptile cage envirnoment contoller.
Wouldn’t be too difficult but you’d need to do some hacking (or make some tweaks to the board). I’d remove one of the switches to free up one of the Arduino ADC lines and wire in a sensor like this one. Then some minor tweaks to one of the provided example codes (like the Maintain Temp sketch) and you’ll have what you are looking for!
How about a simpler model that you just set on / off times on by plugging into USB on your pc. They’d sell here in ZA and other developing nations that enjoy technology and have a sometimes unreliable power supply. Security on an easy timer would also be a selling point. Get them made in China 😉
All that functionality is there in Portlet. Just leave out all the components you don’t need and you can cut down a lot on costs.
But if all you need is simple on or off then this PowerTail from Sparkfun might be easier for you to put together
We’ll call it the “Noff” because it switches on and off!
Love it!
Hi there everyone, it’s my first pay a visit at this web site,
and article is actually fruitful designed for me, keep up posting these articles or
reviews.